Engine Rebuild & Assembly Instructions
RPM-Ron's Precision Machine, Inc.
Don't forget to save to favorites
| Engine Rebuild Kit and Parts Online Catalog |
|
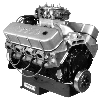
Balancing & blue printing - click on that subject to view what that entails. TIPS for rebuilding your engine. The example below is for a V8 engine. |
| See Crankshafts and arrow down for crankshaft installation guide as well as the information below. |
Cleanliness cannot be over stressed!
|
The first step in the cleaning process is to clean the area in which you are going to assemble your newly machined engine. Next completely wash engine block: *Re-move galley plugs & brush out all oil galleys. *Use soap and water to wash out cylinders then completely dry with air & linen (no lint), and use light oil in lifter bores, main bore, cylinder walls, etc., after washing. TOOLS *Tools that will be needed are: engine stand, torque wrench, ring compressor, hammer with plastic or wood handle, wrench & socket set, assembly lube, oil, gasket sealer, oil pump primer, engine paint, galley brush set, freeze plug installer, thread sealer, engine turning socket, and a lot of patience. NEXT *Brush out oil holes in crankshaft! *Arrange engine & engine parts in order of assembly *Install freeze plugs, cam plug, and all galley plugs. (You may want to paint back of block). *Mount engine block on suitable engine stand and turn up-side down. *Install camshaft first, being especially careful not to damage cam bearings. Use engine assembly lube on cam bearings, and camshaft lube on camshaft. *Install main bearings in block & lube with assembly lube. (High pressure lube) *Lay crankshaft into main bearings for clearance checking purposes. *Place a piece of plasti-gage lengthwise across main journal
then install *Dis-assemble what you just did and check your clearance using the paper the plasti-gage came in, the spaces on the side of package is your clearance. *Install the rear main seal (if a two piece rear seal is being used, it will have to be installed in block and cap before crankshaft is laid in block) . Be sure and follow instructions in your gasket set for seal installation. *Clean plasti-gage off crankshaft and place crank back in block (be sure not to forget to install your rear seal). Install main caps and bolts, and torque all caps down to specs. except the thrust bearing cap. You now need to set the thrust on that cap if it is not pinned! To set thrust, just barely snug bolts to that cap, then use a hammer (on a counter weight) and hit the crankshaft to the rear of engine, then to the front of engine last, then torque that cap down to specs. and check end play of crank. Most crankshaft thrusts are between .004-to.010 end play. *Install timing chain and gears. Now is a good time to degree in camshaft. Click on degree camshaft at top of page. *Oil wrist pins in pistons heavily, install rod bearings, install rings on pistons. There is a certain sequence and placement of rings not covered here. *When removing rod caps, a suitable rod vise is required so damaged is not done to connecting rod. *Turn engine right side up and oil all the cylinders, rod bearings, pistons and rings, and crankshaft journals. Use oil (30 weight) on pistons, rings, and cylinder wall, and engine assembly lube on crankshaft and all bearings. *Install a suitable ring compressor over piston (be sure rings are correctly placed on pistons), install plastic or rubber boots over rod bolts (so you don't scratch cylinder walls or nick the crankshaft), place the first piston in hole, tap the piston in cylinder using a wood or plastic hammer handle. As you are tapping piston down into the cylinder, be sure and center the rod bolts over the crank journal or damage will result. *If you want to (and you should) check rod bearing clearance, there are several ways to do this. If nothing else, you should plasti-gage before oiling crank or bearings. Then clean off plasti-gage and do the steps over again. *Install rod cap to that con-rod (do not mix up caps from
one rod to another) *Install rod nuts with proper lube and snug nuts only at this time. Install the rest of piston and rod assemblies in their proper cylinders. *Torque all rods nuts to torque specs. either by ft.lbs. or the bolt stretch method, after all rod and piston assemblies are installed. *Turn engine back upside down and install timing cover, oil pump (be sure and prime pump first), oil pump drive rod, pick-up screen (be sure it is new or perfectly clean inside and out, oil pan gasket, timing cover gasket, timing cover, and oil pan (sealing it properly). *Turn engine back right side up and install cylinder head gasket (s), cylinder head (s), and bolts, (some head bolts require sealant) and torque heads to specs. Install valve train components, set vales, etc. and install intake manifold and bolts. Be sure that deck and all surfaces are clean and free of oil. *Tape off any areas that you do not want painted, and be sure you put something in spark plug holes, and paint the engine. Use engine enamel. *Install oil filter adaptor and oil filter, and oil in engine. Use 30 weight oil for engine break-in. *Prime engine (with suitable tool) with drill motor, while turning engine over by hand with a suitable tool until all rocker arms are oiling. All oil galleys must be full. If you cannot prime engine, then you need to fill all oil galleys with a tank filled with oil mounted to the oil pressure switch hole. At very least, do not crank engine over with spark plugs installed if the engine has not been primed! We use an oil pressure gauge to check oil pressure when priming engine. *Install valve cover(s). It is usually best to seal gasket to valve cover, not to head so valve cover re-moval is more simple if it ever has to come off. *If you haven't painted engine yet, clean off any spilled oil on block or parts to be painted, then paint what you want with engine enamel. If you made it to here, congratulations Your engine should be ready to install, click on engine start-up |
If you need any parts or engine rebuild kits Click Here
RPM - RON'S PRECISION MACHINE, INC.
69 E. 580 N.
Santaquin, Utah 84655
1-801-754-5338 or Toll free 1-866-700-5877
Contact us anytime
24-7
Hours 9-5 Monday-Friday Mtn. Time
| Call toll free 1-866-700-5877 or click Contact us anytime 24-7 Hours 9-5 Monday-Friday to order parts or check stock |